2. TOOLS OF THE TRADEEco-purists may prefer to wreak havoc using their bare hands and renewably produced wooden/stone tools. I take the view that to defeat a technologically advanced opposition, we ourselves must adopt these technological skills and use them to appropriate ends.
2.1 What do you need tools for?A tool is a means to aid an outcome. If I want to insert a nail into wood I use a hammer, not my head. Likewise, if I want to spike a fuel tank to blow a JCB (less noisy than hammering off the locked fuel cap) I use a centre-punch. Only Babylon's infernal machines can bring Babylon down. So what do you need?... The first question you must ask is, 'what am I going to do?'. That will determine the tooling requirements: There are also other considerations. You could easily spend £500 tooling up for some serious sabotage. On the other hand, at a moment's notice you might have to dump the lot into the nearest river. You must also expect losses, breakages and damage through wear and tear. Cost must therefore come into the plan. You could use second hand tools (so long as you obliterate all identifying marks), or you could buy cheap tools - but cheap tools, in my experience, often fail when you need them most (tip: never buy cheap bolt cutters!!). You must also consider the amount of trouble you want to get into. When travelling to or from the hit you could get pulled in for 'going equipped'. For obvious reasons it is better to get pulled in with just a screwdriver and side-cutters rather than portable oxyacetylene equipment. 2.2 How to organise your toolsAs stated above, tools must be: This last point is, I think, the most important. Modern forensic science can do wondrous things. They could match the hydraulic fluid on your bolt cutters to that of a wrecked earth-mover. They could match the manganese/chromium content of your hardened steel Allen keys to the traces of metal on a removed bolt. More basically, they can match the imprint of your boots to footprints found on the scene of the crime. NEVER - NEVER - NEVER take your used tools home again. You should find a safe hiding place, well out of the way of the public but with easy and unsuspicious access, and stash your equipment there. As well as your tools you should stash clothes, footwear and gloves. Anything which could connect you to the scene of the incident - excepting you own body which you must always scrub clean afterwards - should be stashed. If possible, and if money permits, keep more than one stash of equipment. After using tools you should never go back to the stash site for one to three weeks - perhaps six if the hit caused a bit of a commotion. Being able to pick and choose your stash, perhaps having one stash for each area you operate in allows you to randomise hits/equipment use, and let the 'heat' die down between events. Equipment can be stored in a number of ways: You should ensure that they are kept dry, or in oiled rags/canvas to prevent rust. Chemicals need to be stored in leak proof containers which will not corrode. Clothes really need to be kept in air/water tight containers until you can wash them some weeks/months later. A good tip - never put your eggs in one basket. If possible have a number of stashes in a small area to minimise losses if any one stash is discovered. The key thing when considering tools is to ensure that they are untraceable. If you must buy tools, always pay in cash. Never buy mail order tools. If possible, buy them fifty miles from where you live, using wholesale outlets where possible so that the volume of trading covers up your small purchases. Never buy in a pattern - if you buy three bags of fertiliser, a bag of icing sugar and a box of charcoal, and then a few days later a chemical fire destroys 6 JCBs, it's a bit obvious who did it! Spread your purchases by location, by product, and if possible by as wide a time gap as possible. And like tool storage, unless it is unavoidable, never take really incriminating evidence home ("excuse me sir, what is an accountant doing with a pocket welding torch and a pair of heavy duty bolt cutters"). 2.3 The basic toolkitIf you just want to make a general nuisance of yourself then I would suggest:
However, a more planned and directed outing may require specialised tools such as drills, hand held blow torches and solder, oil filter straps or thread taps. You can actually have a fun night on a pair of heavy-duty side cutters and centre-punch/screwdriver alone. As said at the beginning, knowledge of basic engineering/mechanical principles can make up for lack of tooling. If you don't have tungsten-carbide powder to put in the sump of an engine, then sand will do just as well. And even if you only have a spark-plug spanner, taking out the plugs, dropping in two or three small bolts/ball bearings and then replacing the plugs will do more damage than cutting all the cables and fuel lines in sight. If you build up your stash over time then there are basic items you need. A factor you must consider is how many of you will be doing the work. I primarily work alone and so tooling needs are minimal. Having to wait your turn for the bolt-cutters wastes time and increases the risk of detection. Where there is more than one person working multiples of basic tools are essential. Here is a list to begin with. It is an ideal list - I don't take everything all the time, although 90% of the time I do take the basics like cutters, sugar and first-aid kits: Much of the above can be bought cheaply as sets through catalogue stores such as Index or Argos. I get my tools from Argos - this is because they have a lot of branches, so I don't have to buy them in my home town, and although the quality of the sets is not high the tools are good enough for the price you pay and are not so expensive that dumping them in the canal is not a major set-back. Examples of the sort of deals Argos does are (look in the 'tools' section of the catalogue): The first two items on this list form the major part of a tool stash for only £45. All you would have to buy in addition to these would be glue, sugar, grinding powder, bolt cutters, a couple of chisels and a lump hammer. In fact, even without the additional items, you could do a lot of damage with these tools. The following section gives brief information on commonly available tools, and how to use them in different situations. 2.3.1 CuttersThere are a few basic types of cutter, working on two basic principles; shearing cutting edges like scissors, and lever action cutting edges, normally for cutting heavy duty items like wire or bolts. Quality and price vary enormously. Side cutters are the basic tool of any assault on electrical or mechanical equipment. Light weight cutters will part mains cable and plastic fuel/pneumatic lines. Heavy duty cutters - with bolt cutting action if possible - will take out steel cable, metal fuel/hydraulic lines, and you can snip away at lightweight steel/aluminium sheets. When all else fails, the pointed end on the cutters will smash the dials/covers on instrumentation panels too (but a chisel/centre-punch is better). General cost depends upon quality. Lightweight, cheap cutters come in at £4 - £5. Average quality cutters suitable for electrics and thin steel are about £15. High quality, hardened heavy duty cutters cost £25 upwards. Figures 3-4: Bolt cutting action side cutters and grip/cutter pliers
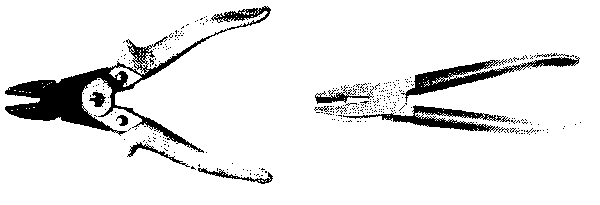 Bolt cutters are like side cutters, but an arrangement of cams and pivots increases the leverage to increase the cutting pressure applied. The extra complexity also costs more. Average side cutters will get through fences, but after forty or fifty snips your arms begin to ache. 12" bolt cutters (the length of the handle determines the strength of the cut) will snip through more easily, and they are easier to use because you use them with two hands. The big version, with 3ft long handles, will quite easily cut hardened steel bolts/rods a quarter inch thick. The unfortunate problem is cost. Bolt action side cutters start around £35 - £40. Fully fledged 12" cutters cost around £60 - £80. Oversize bolt cutters which could tackle bolts and hydraulic lines come in at £100 plus. These are sold with nearly all toolkits. They are pliers with a small cutting edge near the hinge, and sometimes wire crops fitted on the hinge pivot. I don't normally use these because side cutters are better, and purpose made pliers are of more use for that task too. These are useful little tools which clamp around pipes. You then turn the tool around the pipe and a small hardened bit takes a bit out of the pipe, similar to how a lathe tool works. As it completes each small cut, you wind in the bit slightly to cut more metal. After a minute or less the pipe falls in half. Useful on electrical conduits, water and hydraulic pipes between one quarter and two inches in diameter. Cost - basic plumbers' model (made for soft ductile copper pipes) is about £30. Industrial models used by pipe fitters cost £60 upwards. Figures 5 and 6: Pipe cutter and tin snips
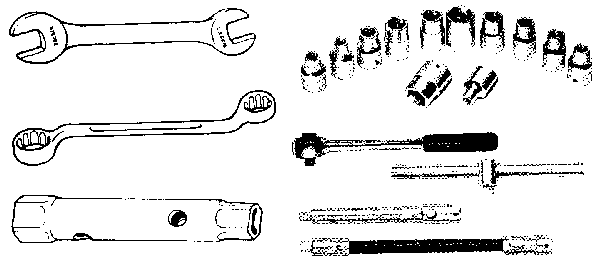
 Tin snips are really glorified scissors, used to cut metal sheet. They look like extra heavy-duty scissors. They are useful to cut open bonnets, rigid plastic sheeting, canvas, or the corrugated steel cladding on the outside of modern industrial buildings. You can also deface lightweight metal/plastic signs by cutting them in two or more pieces. Prices start around £15. 2.3.2 Spanners/wrenches and pliersThere are a wide variety of spanners on the market; open ended, ring, adjustable. There are also a wide variety of pliers and grips which are also useful for gripping and unscrewing nuts and bolts. Spanners come in two measurements - metric and imperial. Most old/American made equipment uses imperial measurements, but new equipment or foreign made plant uses metric. The problem is not so much damaging the nut or bolt involved - it's more likely that you'll damage you spanner if you use the wrong size. There are different types of spanner - open ended, ring, and sockets. Open ended are fairly straightforward to use, but ring spanners and sockets are generally better because you can put more force on the nut without stripping the corners off. Sockets are very useful because rather than have a set of large spanners, you have one ratchet or T-bar and a set of metric/imperial sockets to fit it. The problem is that in the dark, with oily hands, they're easy to drop. But you can also get extension bars and even flexible torque extensions for sockets - very good if you're doing engine 'maintenance' rather than engine destruction. You can also get some hybrid types. Box spanners are half way between a socket and a normal spanner, and are indented for use on deeply sunk nuts. The most useful box spanner is the 'plug spanner' which fits spark plugs on petrol engines. Figures 7, 8, 9 and 10: Open ended spanner, ring spanner, box spanner and sockets set (with ratched/T-bar and sockets)
 Wrenches are basically adjustable spanners. Different types perform different tasks. Adjustable pliers are more useful than normal pliers because you can adjust the size of the jaws to fit the job in hand - they are particularly useful for undoing the nut fittings on pipework. Cost - starts around £15. Figures 11, 12, 13 and 14: Utility pliers, 'Mole' grips, adjustable spanner and 'Stilson' wrench
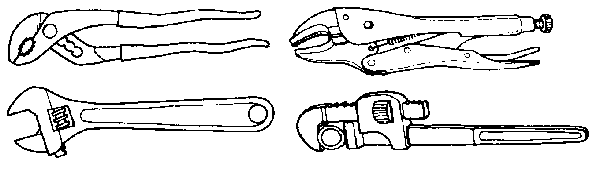 Adjustable spanners, which come in a range of sizes, are like open ended spanners, but a screw fitting allows you to adjust the open gap. Carrying two or three adjustables is more useful than a whole set of open ended spanners, and there's no duplication because they fit imperial and metric. The only problem is that you can't use as much force on the nut as you can with ring spanners and socket sets - the same problem as with normal open ended spanners. Cost - 7" (they are sold by the length of the handle) start between £5 and £10. 12" and above cost more than £20. 'Mole' grips are a cross between both of the above, with the advantage that once the gap is set they can be 'locked' on the nut due to their spring action. The size of the gap is adjusted by a screw knob in the handle. These are very useful because you can set them up on a bolt on one side of a panel, and work on the other side of the panel, and as long the the handle of the grips is stopped by an obstruction or they are tied off, they will hold the bolt in place. Prices start around £15-£20, rising to £35 and above for larger and more expensive versions. 'Stilsons' are the ultimate in adjustable spanners, made especially for large pipe fitting (2" or 4" and above). They are horribly expensive, but if you have a 4 foot set of stilsons, you can move even the tightest nuts on pipework/manifold systems. Cost £100 plus. Figure 15: 'Allen'/hex key
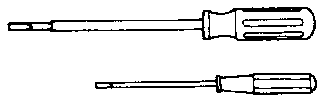
 'Allen' keys or hex-keys are hexagonal sections of metal bent into an 'L' shape. Hardened screws or bolts in motors/plant quite often have hexagonal sockets in their caps. Like spanners, Allen keys come in metric and imperial sizes. I also highly recommend Allen keys with a 'ball' end - these are much easier to use for unscrewing bolts. Cost of Allen keys varies enormously depending upon their quality. The best are made from high tensile hardened steel. Sets cost between £7.50 and £25. Figures 16, 17, 2 and 18: Spade end, posidrive, electrical and ratchet screwdrivers
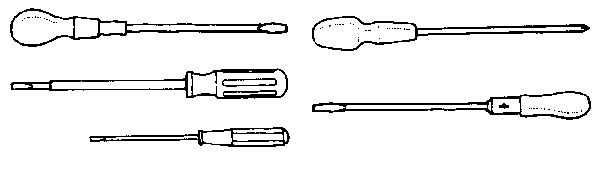 2.3.3 Screw driversThere are two basic types of screwdriver - spade ended and 'posidrive' (cross) ended. They come in varying sizes from miniature (2mm wide) through to half an inch or so. You can also get different designs. Electrical screwdrivers have plastic insulation running right down to the tip so that you can touch live wires with them and not electrocute yourself. Like socket sets you can also get 'ratchet' screwdrivers. These are quite useful when screwing at arms length because you don't have to let go - you just rotate your hand either way (the direction is controlled by a small switch). You can even get screw drivers with a box end to fit different sockets on - but the usual problem of changing bits in the dark applies. Screwdrivers have four basic uses: As a screwdriver, to screw/unscrew bolts/screws/threaded pins; 2.3.4 DrillsI'm not aware of drills being used that much in eco-sabotage, which is a pity, because you can cause tremendous damage with them. Drills are either powered or manual. The advent of rechargeable drills means that you now have the luxury of using a power drill on locks, electronics, and other sensitive equipment. A power drill is a power drill - not much to say. The only problem with rechargeables is that you'll need to charge it before you go out, which means taking it somewhere to charge, and visiting your stash twice before the hit. Rechargeables are also expensive for the half hour or so of drilling they give you. A normal power drill costs £30 - £50. A 'cordless' drill will cost £100 - £150. Figures 19, 20, 21, 22 and 23: Rotary hand drill, brace drill and power drill, with twist and brace drill bits
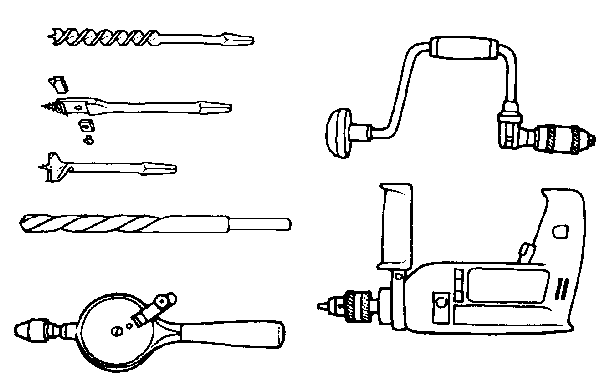 I prefer manual drills - they don't run out of juice and they are quieter. The power drill gives you the advantage of being able to drill big holes quickly. With a manual drill it's difficult to drill big holes quickly, but small ones (say, less than 4mm) are no problem. I normally use a standard 'rotary' drill. Another option is to use a 'brace and bit'. This tool is more aimed at drilling large holes in wood - not much good for making holes in engine blocks, but damn' good for weakening/toppling wooden telephone/power poles and fence posts. A standard tactic is to turn the base of the power pole into swiss cheese drilling a dozen or so holes in it with a brace and bit, and then burn what's left (it's not a good idea to be around when a live power cable hits the ground). Hand drills start at around £15 - a good brace can cost £30 or more. Selecting the right drill bit is very important. Learning how to sharpen them is also important since, in order to work quickly, you may have to use more than five or six bits for each hour's drilling because the hardened metals of modern earth-moving machinery blunt them quickly. Drill bits fall into five categories - wood, metal, high speed metal, masonry and brace bits. To many people the first three look very similar - but wood drills are given away by their deeply grooved thread. Masonry bits have two small hardened 'wings' at the end to penetrate the material. Brace bits - well, they are just big, and like wood drills they have a deep thread. Using a hand drill on metal you have the option of using hardened or high-speed steel (HSS) bits. HSS bits last longer, but are more expensive - if you have the money get HSS. Masonry bits also come in hardened steel and diamond tipped. Brace bits come in varying sizes and types - a 1" bit is the best for boring holes in posts and poles. 2.3.5 SawsThere are different saws for different jobs. In sabotage you are most likely to be cutting metals. However, if you are cutting wood then don't use a 'normal' wood saw. Use a 'bow' saw. Bow saws don't do as neat a job as carpentry saws, but then again, you are looking for speed of cut not a master carpenter's matching edges. Bow saws start around £15. I suggest the smaller non symmetrical (pointed towards one end) type normally used for pruning - they are smaller, lightweight, but do the job just the same. When cutting metals there are two considerations - thickness and hardness. Hardness is taken care of by using the appropriate blade. Thickness will determine the type of saw you use. Standard 'junior' hacksaws won't tackle anything beyond 4mm-6mm of mild steel. For this reason I always use a small hacksaw - although you may need to resort to a full size hacksaw for a larger job. The key thing to remember is to buy five or ten blades. On hard steel the blades will blunt quickly, and the brittleness of the high-tensile steel blade means that they break easily. Hole saws are a hybrid between a drill bit and a saw. They fit in a power drill (I normally fit them to a brace - works just as well but a little slower). The drill bit enters the material to keep an accurate centre, then the circular blade cuts a neat circle through. They work easily on wood (good for making spy holes in fences) but metal requires a bit more care. Any sheet steel thicker than 3mm or aluminium thicker than 5mm - 6mm will begin to give you problems. But where you have the bonnet of an earth mover which is locked down and you can't get it off, hole drills provide an alternative means of access. Prices start at £5 - £10, and go up. Figures 24, 25, 26 and 27: Hacksaw and hole saw, flat files, and cross section of needle files
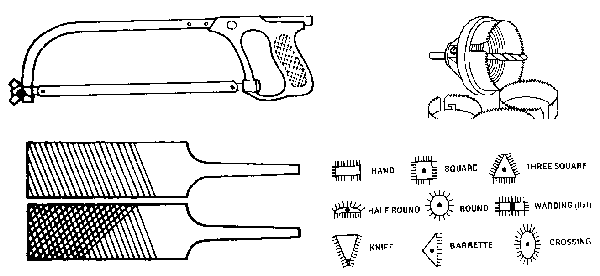 Files are very useful things, especially on precision engineered mechanisms. You will be aware of the standard 'flat' file an inch or so across, but 'needle' files are of much more use. A flat file can spoil most precision/polished metal objects, but needle files are more versatile. You can stick them in holes to make them bigger, or cut small notches to weaken high tensile steel. The best of all are round files because you can stick these in the chuck of a power/rotary drill and file away at high speed. The thickness of round/needle files varies between 2mm - 3mm up to about 10mm. Normal flat files, for metalwork, cost a quid or two. Needle files vary between 50p and a pound - but if you put a needle file in a drill and bore into an engine block there tends to be not a lot left when you've finished. A petrol driven or electric angle grinder, with a high speed metal cutting disk fitted, is the most fiendish weapon in the arsenal of any eco-saboteur. I haven't got one, but in my last engineering job I used them all the time, and I live in hope that one will fall into my lap. Unfortunately they're bloody noisy things - with petrol driven ones you don't need to worry about noise from the engine because as soon as the cutting disk hits the steel everyone will know you're there anyway. Electric ones make the same amount of racket too. The only way to prevent it is to damp the object using earth, rags or weights - but it'll still make some noise, mainly from the cutting disc itself. Figure 28: Typical angle grinder
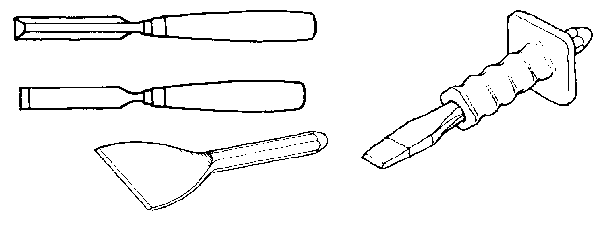
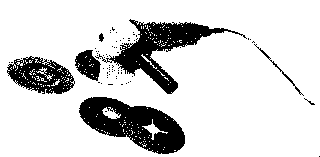 Angle grinders are also expensive (pleasure is never cheap!) - £200 for a petrol driven one, £80 - £100 for a good electric one. You can even get rechargeable 'cordless' ones but they're not much good. The disks are also expensive, perhaps £10 - £20 for the highest grade, diamond encrusted ceramic blade for cutting steel, but with one of these things you could cut through a 6" square, half-inch steel box girder in a few minutes - at least as fast as you could cut with an oxyacetylene torch. If you mean business - get an angle grinder. Chainsaws are expensive, heavy, and difficult to use in stressed circumstances. However, if you want to do some mass fence post felling, it's really the only way to do it. One trick I saw a landscape gardener use was to bolt the exhaust from a garden mower onto the exhaust outlet - this reduced the noise output by 90%. Even so, at a cost of £200-£300, it's not the sort of thing you want to throw away when escaping. Chainsaws will also cut thin metals - car and van bodies for example (earth movers tend to be made from a heavier gauge steel so it would be rather dangerous to try it on these). This give some interesting ideas for anti car actions - and perhaps an alternative to just scratching the paint! 2.3.6 ChiselsChisels are useful things - you can make holes in things, split things apart, shear things off, and if bored, you can carve letters into the bonnet of the nearest offensive sports car (bevelled chisels are best for carving). Chisels come in varying sizes and types. Most standard chisels are wood use oriented, but their sharp edges make them useful for puncturing plastic pipes, hammering through circuit boards and instrument panels, or with care you can cut metal sheet in half if the edge is sharp enough. Wood chisels are either square (standard shape) or have bevelled edges for angled work. Sizes vary between a few millimetres and an inch or two. Costs vary between a few pounds to £15. You can even get 'U' shaped chisels - call gouges (mainly use for wood turning) - which are good for chopping lumps out of things. 'Cold' chisels are primarily for stone work, although their basic strength (as a short pointy iron bar) make them ideal for panel beating and other such work. The one illustrated below has a plastic handle so you don't bash your hand, but at times this can get in the way. Sizes vary between a quarter of an inch to one or two inches - prices between £2 and £10. Cold chisels are particularly good for punching dents into sheets of metal, smashing locks, catches, pipe fixings, glass, instrument panels, circuit boards, and any delicate equipment which doesn't react well to sudden shocks. Figures 29, 30, 31 and 32: 'Bevelled' chisel, cold chisel (with plastic handle), standard chisel and bolster
 Bolsters are wide chisels with long thin edges, primarily intended for stonemasonry, splitting bricks, etc. However, if you have six or seven of them, sledge-hammered into the base of a brick wall over the space of two or three metres, you can topple it. They're also good for prying spot welds apart, but it ruins the edge doing so. Costs vary between £5 and £15. Splitting wedges are wedge shaped lumps of steel, 3-6 inches wide, 6-8 inches long, and perhaps 1 - 2 inches thick at the widest part of the wedge. They are primarily intended for splitting logs and tree trunks by progressively hammering them into the wood with a sledgehammer; but they also work well on walls, masonry, locks, doors and hinges, and anything weakly bonded/stuck together that you would like to part. A centre punch is a small steel bar, flat at one end where you hit it, and pointed at the other where it does the damage. Centre punches are really useful ways of piercing metal sheets, fouling up locks, and punching holes in die-cast aluminium/cast iron or plastic boxes such as gearboxes, cylinder heads, pump housings and electrical junction boxes. Costs and sizes vary - expect to pay between 50p and £5. Figure 33: Steel centre punch
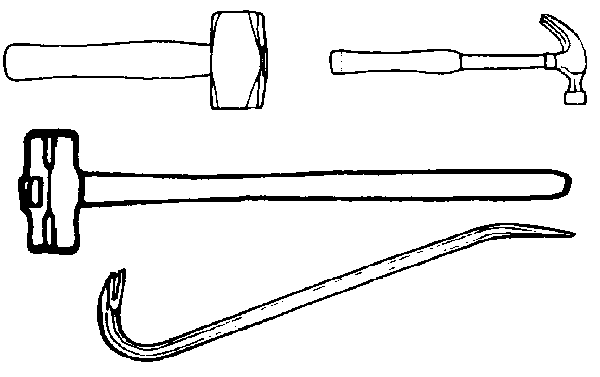
 'Automatic' centre punches are slightly different. Within the body of the punch is a spring loaded spike. You push the end of the implement against the surface of something, and when the spring loaded bar is nearly all the way in a trigger releases and drives the metal spike into the surface - the pressure with which it does this is normally adjustable. These punches are normally used to mark things before drilling or engraving. The best sab-use for centre punches is breaking unbreakable 'toughened' safety glass - but wear a mask and/or goggles to protect yourself against splinters. They can also be used on computer screens (this is actually rather dangerous), instrument panels and metal cans (if you puncture a petrol can or fuel line the small hole ensures a low leakage rate, and hence a time delay for initiating a fire). For a good automatic punch expect to pay between £10 and £25. These implements can do a lot of damage in the right hands. Pick axes are good for making holes in walls and concrete. Axes are best used for making holes in fences, cutting cables and modifying sheet metalwork. I consider their use limited though because they make an awful lot of noise, and they weigh a lot. If you have a problem with underground pipes, then pick-axes can solve them for you. Likewise, axes are a good way of finding buried cable in walls, or splitting wiring conduits. 2.3.7 Hammers/barsHammers can do a lot of damage - but in doing so you make a lot of noise, which is a bit of a problem when security is tight. There are ways around this - you can damp the noise of the hammer by wrapping it in canvas or rags, but the thing you are hitting, if it is remotely hollow, will still resonate uncontrollably. There are different types of hammer, the main difference being the weight of the head - this affects the energy the hammer imparts to the object: Finally, bars. There are three types of bar commonly used in construction. Both crowbars and jemmys are, in my toolkit, standard issue. With a little practice you can prize things open, a quick back hand using the rounded end as a hammer head dents or smashes most levers, switches and instrumentation, and by holding the rounded end and stabbing with the spade end you can punch holes in control panels, lightweight sheet steel, and using this method will easily dislodge bricks/coping stones. A crowbar will set you back between £5 and £20. A jemmy normally goes at tool sales for £2 to £5. Figures 34, 35, 36 and 37: Lump hammer, claw hammer, sledge hammer and crowbar
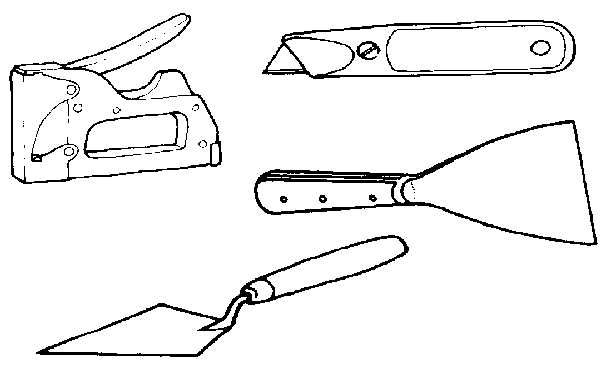
 2.3.8 Specialised tools - jacks, taps, staple-guns etc.There are a variety of 'non-standard' items which lend themselves to use in specific situations. These mostly involve the application of large amounts for force, or causing maximum hassle for the victim. Staple guns are relatively cheap at £20-£30. The ammunition is even cheaper, 200-300 staples for £1-£2. An upholstery staple gun is what you really need rather than the office type - they are more sturdy, pack a bigger punch, and the heavy-duty staples you load into them give a higher penetration power. The main use for a staple gun is firing metal into electrical cables. This can be a dangerous activity if the cables are live, so you should invest £5-£10 in a 'live wire detector' (available at most good DIY stores). You run the detector over the wires, and if the unit doesn't give out an alarm signal you should be okay. But beware - live wire detectors can have problems with DC current, their response being the variation in the magnetic field in an AC current. My favourite use is on the coaxial cables used in radio transmitters and receivers. The voltage level is generally not high, and if you fire a few staples in every few metres up the antenna mast you'll be sure to take out the system. Transmitters are probably the best target as the shorting effect can blow the expensive output transistors. An example of a target is the gross looking cellphone towers which are springing up all over the country. Figures 38, 39, 40 and 41: Staple gun, 'Stanley'knife, filling knife and pointing trowel
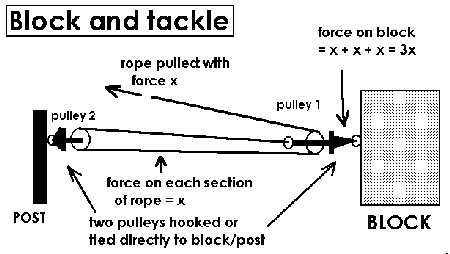
 The point here is, what can't you do with a Stanley knife. Because the blades are retractable they are the perfect in-the-pocket tool - the only problem being if you get stopped by the police who don't take kindly to concealed Stanley knives. Expect to pay between £5 and £10 for a good one with spare blades. So what can you use them for?: Sometimes, only large amounts of force will do - why graffiti a Portakabin when you can tip it over? Jacks an winches perform this task. The average mechanical car jack can develop 2 - 3 tonnes of lifting force - enough to raise a variety of structures and small vehicles. By lifting then propping, building a higher platform for the jack, lifting then propping, a Portakabin could be toppled in five or six lifts, a car/van in two or three. If you have access to a hydraulic jack, they can develop 5-10 tonnes of force. That is of course if you use the jack to just life objects. By baring off between two surfaces - for example between a concrete foundation and a generator or chiller machine - you can strip the object off its mounting studs, or break it into pieces trying. Winches are also useful - you can move/drag heavy objects, or rip them from their fixings. By tying a cable to the bottom of a Portakabin and then winding/levering in the line, you could drag it from it's original position into a hole, over a quarry face or, by fixing to the far bottom side and pulling over the top of its roof, just turn it over. You could also lash up to an object - the jib of a crane for example, and pull it over. The classic winching system is the standard 'block and tackle'. This is a device which uses pulleys to multiply the force applied to the rope. The rope is coiled around one or two pulleys, so each rope will be bearing the same force as the rope being pulled - but this force is multiplied by the number of strands threaded between the object and the fixing point or post. A rope coiled once over a pulley and fixed to a point will double the applied force. Three stands will triple it, etc. The illustration below shows how this is done. Figure 42: Block and tackle
 Small pulleys are available from any hardware store - cost between £2 and £10. The heavy duty type block has to be ordered specially and costs a lot of money. You can also buy mechanical winches which have a drum of wire, and a gearing mechanism to increase the power or the manual or engine drive. Finally, there are chain-winches which utilised a teethed ratchet mechanism to tighten chains. These are really useful, but expensive. Mechanical car jacks are cheap, and normally are easy to come by from parts or scrap dealers. High power hydraulic jacks are likely to cost you £50-£60 from the same sources. Winches tend to be more of a problem. A basic block and tackle can be bought for under £50 - mechanical winches, especially the sort that use chains, are harder to come by (I know, I've tried). The best advice I can give before undertaking such activities is to read a mechanics/physics book, and understand the vector components of tension/compression forces - that way things will work better for you. Figure 43: Rope winch
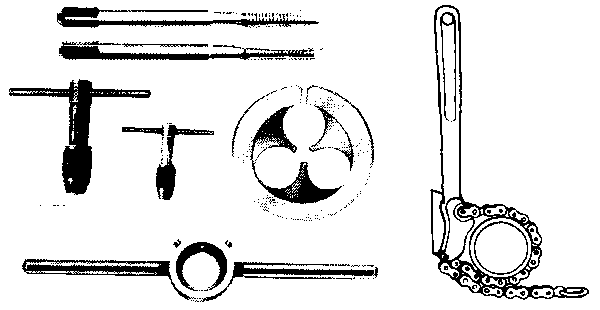
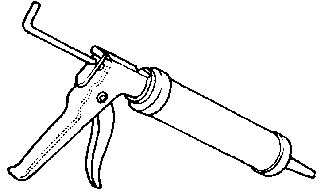
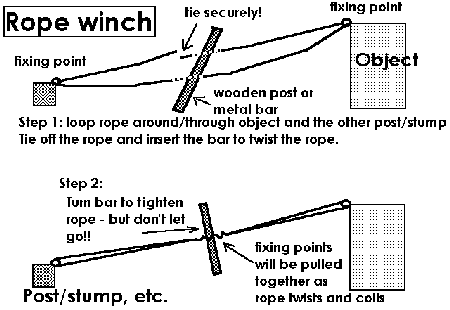 Finally, if you don't have a winch to hand, don't worry. The alternative is to get a long piece of rope or cable. Sling the rope around the object you want to move, and the other end around a fixed point (a post, stump, or something heavier than the object you want to pull). Tie the ends together to form a tight loop of rope/cable between the two objects. Insert a bar or thick wooden post between the two lines of rope, roughly half way between the two objects, and start turning it around and around, twisting the ropes together. As you continue to turn, the ropes/cable will tighten, dragging the two objects together. But beware - if you let go of the bar or post it will start spinning and could injure you. Likewise, if the ropes or cables become so tightly wound that they are beyond the breaking strain of the ropes, the whole set-up up could snap and come hurtling towards you! No - not the water sort. A tap is a small metal rod which scours a thread in a hole so that you can screw in a bolt. Mostly people think of how to break into things - well, what about making sure nobody gets in? For example, take a door on an earth mover. Rather than trying to break it open, why not make sure no-one opens it? The door will shut up against the frame of the cab. If you drill holes of the right size through the door, into the cab frame, and then tap these holes to take a screw bolt, you can bolt the door shut. To make certain nobody unbolts it it's better to countersink the bolts, put superglue on the bolt before you screw it in, and always use an allen key bolt so that you can drill out the hex socket when you've finished. It's best if you practice this sort of thing - the skill would be taught in any basic college evening course on metalwork. The diagram above shows two taps, and the T-bars which they fit into. A basic set of taps will set you back £15 - £40. Another option is to thread a solid steel rod and screw it into something to provide an obstruction. This is done by fitting a die into the T-bar with the round hole, and then screwing it along the bar or pipe to make the thread. You then drill and tap a hole at the object, end, then screw the bar into it. A set of dies will set you back £15 - £40. Figures 44 and 45: Tap/die set, and a chain wrench
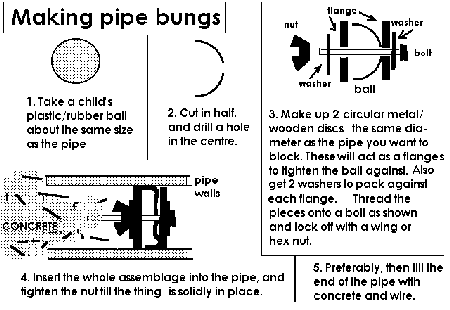
 Chain wrenches are useful for unscrewing large pipes. They are normally used by professional pipe fitters, and are expensive things to buy. You can actually lash up something similar using an iron bar and a bike chain. Another thing you can use them for is removing the big oil filters from earth movers. A very useful tool for use in neatly breaking windows. Glass cutting tools are commonly available for a few pounds. It is essentially a steel bar with diamond teeth (by scraping the diamond across a sheet of glass to create a weakness in the brittle surface). When stress is applied to the glass (e.g., your boot) the glass breaks along this line. Straight lines are best - it is very difficult to cut curves in glass. When laying new pipes, contractors often fit little rubber bungs with a screw key. As the key is turned, the bung expands against the walls of the pipe and tightly blocks it. There is no reason why you couldn't do the same. For example, go to the head office of McNasty plc and find their sewer outlet. Stick in the right size of bung, and for good measure, back fill the open end of the pipe and part of the man-hole cover with concrete. The illustration below shows how you can make bungs from commonly available parts. Alternatively, find a supply pipe to a plant - water or gas for example - glue, solder or weld it shut, and then backfill the hole with concrete. Figure 52: Home-made pipe bungs
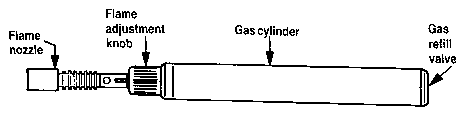
 Today there is a new range of miniature blow-torches available. If you want to do lots of damage then the traditional blow torch the size of a bucket is needed, but miniature blow torches work as well in certain instances. Also, a 'micro-gas torch', running on lighter fuel (butane) will only cost you about £7 - £12, burns at approx. 1,300 degrees Celsius, and runs for 30 minutes on one tank full of gas. Figure 46: Miniature blow torch
 There are basically six things you can do with a miniature gas torch: Fully fledged welding equipment can also prove useful, but it requires more skill to use, and its immense weight causes transport problems. Also, with arc welding equipment, you need a hefty power source. All in all, miniature blow torches perform better when considering the hassle you get in using the full sized equipment. 2.3.9 Glue/abrasives, paints and chemicalsWhen silence is of the greatest importance, or tools are not available, there are alternatives. Glues, glue sprays, paint and abrasive powders can cause as much hassle and destruction as any monkey wrench - and in the case of abrasive powders possibly much more. The thing to be aware of is that certain types of glue are suited only to certain situations - such knowledge comes best through 'on the job' training. There are various types of glue available. For sab work only the following are of any relevance... Standard equipment - comes in 5 gram tubes for about £2. Enough to do 10 or 20 locks if you are careful, but will completely snag up an engine carburettor if you pour the whole tube down the air intake. The drawback with cyanoacrylate is that it will only fill small holes (e.g., Yale locks) effectively, and if you don't pump enough in then there are solvents available that will soften and dissolve the glue. Terribly smelly stuff to use, but it is the most effective means to fill a large hole, pipe or gap. Epoxy resin normally comes in two tubes - the filler and the hardener. You must mix the correct proportions of these together, and then stuff it into the gap you want to fill. A chemical reaction then hardens the mixture - which has the practical benefit that if you loaded some into a syringe (without the needle in order to give you a large nozzle) you can use it as a mini-mastic gun and fill pipes/locks. Cost is around £2-£3 for 25g. To fill a pipe you simply drill a small hole in the pipe (only works on pipes less than 1 inch diameter, which are empty or not under pressure) and fire in the epoxy. Epoxy, because it is a chemically set glue, has the benefit that it is less prone to attack by solvents than is cyanoacrylate. A recent advance is the twin tube dispenser. What you get is essentially a double barrelled syringe. When you press the plunger the correct quantities of filler and hardener are dispensed. You then just mix them together. The twin-tube also has the benefit that you can fire the stuff into a large lock or padlock, and then mix in-situ using a small nail or screw (but it's better if they are mixed thoroughly before putting inside the lock). Cost is around £3 for 25g. This is a type of glue which requires no air to set. The benefit is that you can unscrew nuts/bolts, cover them in threadlock, and them screw them back. They then will never be moved again. This is normally sold by electrical hobbyist stores, prices ranging between £4 for 50g up to £8 for 500g. In effect it's like having a giant bag of epoxy, for less cost, but this material is designed specifically for filling large spaces such as enclosure boxes. Examples of use would be modifying some delicate electrical equipment and then filling the box with potting compound. Another use would be pouring into electric motors, generators, or a confined space which encloses moving parts. To use, get your bag, split the seal in the middle allowing the two halves of the bag to mix, then, when it begins to warm (an indication that it's setting) you cut a hole in the bag and pour into the receptacle. Figure 47: Mastic gun
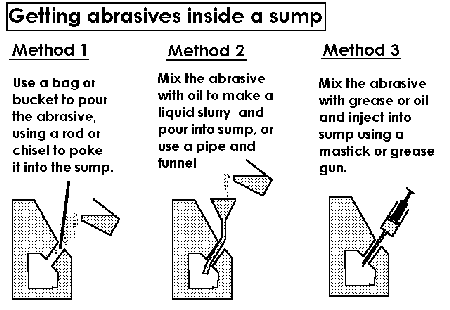
 There are various types of mastic gun, and mastic syringe. The best sort are the adhesive sealants, or the tar/bitumen based damp sealants. Mastic tends not to set very quickly, so its best use is really just to 'gum up' the works. However, it has the advantage that it comes in large tubes for very little cost (about £2-£5 per 250ml tube), and the gun fitting means you can pump large quantities very quickly though small holes using the nozzle attachment. If you clean a tube afterwards (best to clean are bitumen tubes because this is more or less solvent in petrol) you can replace the original filling with grease, paint, shit, custard, etc., and use the tube again (how's that for recycling). Also, if you use lubricating grease, but you mix it thoroughly with sand or grinding powder before you fill the tube, it makes the perfect suspension medium for dispersing abrasive substances in precision engineered equipment - e.g., gearboxes. Examples of use would be firing gunge into electric motors, gearboxes, locks, electrical equipment, carburettors, pipes and valves. Abrasive substances are primarily intended for damaging any precision engineered joint or gear - hence they are perfect for injecting into the sump of an engine, a gearbox, or the bearings of an electric motor or generator. The main types of abrasive are 'tungsten-carbide' powder, or 'silicon-carbide', more commonly known as Carborundum powder. The powders come in different sizes, from lumpy 500 or 1000 grade (looks rather like sand), to the most insidious engine destroyer, 4000 grade (dust like). One cupful is enough to work away on a small engine (the size of an average family car) but on the giant sized earth movers you will need at least a pint (by volume, 200 grams by weight). However, many larger engines are not instantly susceptible to grinding power. The oil filter will take out some of the powder before it has chance to take real effect. The oil filter then clogs, and the increase in oil pressure alerts the user that there is something wrong. Therefore, to be certain that you get your target, you should consider carefully removing the oil filter (if this is possible without losing the contents of the sump), poke holes in the filter paper using a screwdriver or sharpened spike, and then replace it. To do this you will need a special 'filter strap' available from any mechanics shop for £5-£10. If you don't have grinding powder, or you run out halfway through a job, you may have to resort to what's around you. On building sites there is normally plenty of sand around - this makes an acceptable substitute, but will almost certainly clog the filter. Again, a few cups is sufficient. If you just want to hassle people, without the need to mess around with oil filters, then just fill the whole engine casing with sand until you can get no more in. Getting grinding powder or sand into the sump of an engine, gearbox, or the bearing of an motor is not easy - generally you have to suspend it in another medium to form a slurry. You then inject or pour the slurry in. Almost certainly you will have to break or remove the filter gauze on the oil filler cap, but it you have a good enough injection system - for example a mastic gun with four feet of thin flexible tube on the end of the nozzle - you just remove the dip-stick, insert the tubing as far as possible, and pump away. If you are just going to fill the oil sump with sand, just break the filter gauze on the filler spout with a blunt chisel or screwdriver, and then use a cut-off funnel or a cone made from a rolled up sheet of paper to fill. You will more than likely have to use the screwdriver or chisel as a ram-rod to get the stuff down. Another option, that best lends itself to glass or perspex, is sandpaper. You simply get some sandpaper and a sanding block, and sand the glass - giving it a nice translucent frosting in the process. Finally, even large lumps of metal can be employed not so much as abrasives, but in shot-blasting mode. This is best employed on the cylinder block of petrol engines - remove the spark plug using a plug spanner, insert a couple of small steel ball-bearings (the sort kids play with), replace the plug and make it look as if no one had been there. When the engine is started up, within thirty seconds (if the spark plugs last that long!), the cylinder valves and piston are effectively pummelled into a new shape. Figure 48: Getting abrasives into a sump
 Paint is traditionally used in graffiti - but it has other uses. For example, when poured into small holes/locks or precision moving parts, it makes a very good, if weak, glue, and at much less cost per unit volume. There are also other uses. Get a polythene freezer bag, about 15cm - 20cm square. Fill the bag with paint. Close off the bag with a knot or wire tie. You now have an effective paint bomb to lob at your target. Another option is to thin the paint (with water or thinners, as directed on the tin) and use a bicycle pump as a paint gun. With practice you can write quite legibly on billboards or buildings. There are also other 'speciality' paints. The best example of this is 'electrically conductive' paint, normally silver based. This works to best effect on radio antennae which are plastic coated. If you paint the antenna in conductive paint, and then earth the paint to the nearest metal object using a piece of wire, the antenna will neither transmit nor receive (but in practice it's cheaper, but less subtle, just to snap the thing off anyway!). Alternatively, conductive paint sprayed under pressure into delicate electrical equipment is a quick and effective way to write-off the item concerned. Fundamentally, I have a problem with using chemicals - they tend to be difficult to store and carry, and if not used with care could easily injure someone later. In practice the only chemicals I use are acids. As with conductive paint, weak acid sprayed inside equipment can cause great damage - although I always mark the object afterward - "acid poured inside - take precaution against exposure". It can be difficult getting hold of concentrated acids - although some art materials shops sell strong nitric acid for etching plates. I use ferric chloride, a weak acid, but one which is cheap and widely available from electrical hobbyist shops. You can buy a pint of acid, or the crystals to dissolve to make the acid, for about £5. Poured into any electrical equipment, electrical motors, etc., it causes large amounts of corrosion in a short period of time. The other option for chemical use is paint stripper. You can do quite interesting graffiti using paint stripper on buildings. Paint stripper will also attack any lacquered or resinous board - printed circuit boards in electrical equipment for example. Again, you should always label items you have covered in paint stripper so that those discovering your work do not harm themselves. Never forget that on any construction site there is a good supply of concentrated sulphuric acid - in the car/lorry batteries that are part of the engine. Removing these is not much of a problem - all you have to do then is unplug the cell caps and up end the battery over the nearest piece of delicate electrical equipment - the alternator on an engine or generator for example. But be careful - this stuff will burn you if you get it on your skin or clothes. It's also a good idea to leave a note that the item concerned has had acid poured all over it incase those discovering your work hurt themselves. 2.4 Ropes and laddersThere are two sides to using ropes and ladders - gaining access and doing damage. At some point in doing sabotage, you are going to need ropes and ladders. If you have climbing experience you can scale buildings, or abseil down into quarries. I tend not to do this as it restricts your avenues of escape. The most likely use of ropes for the average sab will be scaling walls and fences. Presented with a perimeter fence I prefer to cut my way through rather than go over. If you are crossing a fence, especially one topped with barbed/razor wire, then you should take a piece of old carpet to put over the top to prevent getting caught up on the wire. Ladders are a problem on sab outings - they're not exactly the sort of thing you can carry inconspicuously. The alternative is to take a rope ladder, like those used by cavers, as it rolls away into your rucksack. Before using ropes to scale things you should get some experience first - through your local mountaineering club for example. In terms of doing damage, ropes can be most effective - as described earlier in relation to the 'rope winch'. If you can get hold of a block and tackle - even better. Ropes are also useful for scaling scaffolding, and then pulling it over. 2.5 Preparing/storing your toolsAs stated earlier, unless it is unavoidable, you should never take your tools home - stash them elsewhere. If the police come calling and they find your tools, a quick forensic examination will trace you to your last little escapade. This presents problems of how to store them. The best thing I can recommend are old ammunition cases, purchasable from your local army surplus shop. They are near waterproof, and strong enough (with lockable lids) to take the beatings when being buried, dug up, or slung over the nearest hedge when making a hasty escape. If these are not available, you should use some form of watertight container - a plastic tub or biscuit tin, etc. Another option is to wrap your tools in oily rags, but they will still corrode over time. When getting tools for sab work, never buy anything unique - it's more easily traceable. Buy average, mass produced equipment, not the local hardware stores' own brand. If using old tools, remove any identifying marks before using them. Most importantly, never get tools by mail order, and never pay for them by cheque or credit card - all 'easy to pay' types of money are traceable, cash isn't. A good source of old tools are second hand shops, car boot sales and village shows. Buying tools here makes them untraceable. I rarely grab my tools and run for the hit site - a few days before I check them, do any repairs, oil/sharpen if necessary, and finally give them all a good clean to get rid of any accidental fingerprints - then next time I touch them I'll be wearing gloves. Rather than take everything, your scoping of the hit as part of the planning process should tell you exactly what you will need. If possible, rather than taking two similar tools, take one - e.g., why take light and heavy duty cutters when heavy duty will do both. An essential consideration is what you will carry your tools in. I have a tool belt, with small loops and flaps fixed by studs, which I insert everything in. It suits me as I work alone, but when working in groups you will need a bag. Also, where there is more than one person, elect one person to keep a check and the tool bag to ensure that nothing is left behind. With my tool belt, if there is a gap then I know something's missing. Things like containers, glue or sockets for socket sets go in coat pockets or rucksacks. Glue, paint, powder etc. should be removed from any wrapping materials - never dispose of this material at home!! If the police raid they will go through your rubbish too! Where possible, remove any identifying marks from the containers. If this is not possible repack the material in containers that have no markings (this is generally not possible for glue, so I try to buy glue in plastic/glass containers with peel off/soak off paper labels. You should always take containers away with you - apart from the precaution against accidental fingerprints, it's not wise to actually hand the police evidence. Again, never dispose of used containers in places where they might be associated with you. As with everything else, your carrying bag/belt should be bought specifically - don't use any of your old rucksacks just in case you have to dump it. Fabric does not render up good fingerprints, so handling is less of a problem, but anything plastic coated or metal will - so beware. 2.6 Health and safetyOne thing must be made clear - this work is dangerous. For example, if you were smoking and you accidentally cut a fuel line, you go up in flames (so no smoking on the job!). If you are standing under the jib of an earth mover and you cut the hydraulic line to the ram supporting the jib, it will collapse on top of you (you will either be trapped till you are freed, or squashed!). This illustrates just a few of the problems. To ensure your safety you be aware of a few simple things....
A. Eyes:Where possible, wear goggles. The main danger is getting hydraulic fluid or fuel in your eyes. Also, when drilling or hammering, it is quite easy to get things in your eyes. If you wear glasses it provides some protection - but not as much as a proper pair of safety goggles.
B. Hands:Don't wear lightweight gloves - tough gardening gloves should be considered a minimum. You will be handling sharp objects which can cut or stab you. Small cuts may not seem serious, but from even the smallest cut they may be able to find traces of blood - and that means they'll potentially have a genetic fingerprint of you. Good gloves to wear are industrial gloves with tough woven materials, or motorcycle gloves.Additionally, if you have to wear your boots for any other purpose than sabbing, you should cover them with a big sock, or tie a sack around each foot - this prevents you leaving footprints behind. If the ground is so hard you won't leave footprints, or you keep your boots in your tool stash, this precaution won't be necessary. If you are welding, burning or using a blow torch, you gloves need to be heat resistant, and must not melt (ie, no PVC or plastic).
D. Clothing:If possible, nothing loose fitting. Loose fitting clothes will snag on objects, leaving fragments behind for the police to trace. It also means that you will be more likely to get caught up on barbed wire. I prefer jeans and a close fitting anorak. You should try to ensure that all parts of your body are covered - you risk cutting yourself if bits of your skin are exposed. If you are going to be setting fire to things, try and make sure that what you are wearing is as non-flammable as possible - cotton based textiles are better than nylon.
E. Head:If you are going into a quarry, or if you are going to be toppling things/working inside buildings, wear a hard hat. It is always a good idea to wear something on your head anyway so that you don't leave traces of hair behind you. I prefer a wide brimmed bush hat. It hides my hippy locks, and its wide brim enables me to tilt my head and cover my face if someone is looking at me.
F. Cutting operations:The main thing to beware of when cutting, especially wires under tension, is that the thing won't spring back in your face.
G. Drilling operations:If you are drilling you should wear goggles. Precautions need to be taken when drilling pipes containing fluid under pressure. It's generally not a good idea to drill a pipe full of liquid using a power drill - when you penetrate the pipe you will spray its contents everywhere. Also, if the pipe contains fuel/gas the heat/sparks from the power drill could ignite it. When drilling pipes under pressure you should thread a wooden flange onto the drill bit first, and then drill the pipe. This way, if the pipe sprays, it won't spray over you - it hits the flange and drips down.
Figure 49: Drilling pipes under pressure
 H. Cutting/drilling hydraulic lines and cables:You must always ensure that any hydraulic lines you cut are not going to release the pressure which is holding what you or your associates are standing on or under. For example, on a JCB there are flexible pipes running from the body on to the digger arm. If the arm is suspended in mid air, and you cut the pipe, it will come crashing down. If you are uncertain either trace the pipe to see which hydraulic ram it connects to, or don't cut it. Cables under tension also pose hazards. If you cut the cable on a crane, you could drop the jib. The other main hazard is that as you cut the cable, the end will fly back and hit the person standing a few feet away.
I. Fire/chemicals:When using chemicals wear clothing and goggles to ensure that they don't splash on your skin. If you get some on you find some water and wash it off straight away. If you get some in your eyes get some clean water and wash it out immediately - then get off the site and seek medical help.When setting fire to things - especially where fuel or gas is involved - take precautions to ensure that you are nowhere nearby when the thing goes up. Gas and petrol fumes can flow across the ground, so that even if you are not standing too close you can get a flash as the vapour ignites which will burn you. There are two simple ways to set fire to something; lob a petrol bomb at it or use a time delay incendiary device.
J. Electricity:This potentially poses the most serious hazard. If you cut a live mains cable, it's 50:50 if it'll earth through you or not. If it does you are going to get hurt. At home the 240 volt supply can give you quite a kick. On industrial sites the voltages involved can be 415 volts or higher. If you start messing with electricity substations or power line poles you are talking a minimum of 11,000 volts - this will kill you.On most mobile equipment such as earth movers the voltages involved are low - 12v to 50v. The problem is stationary equipment - if connected to the mains you could be in trouble. You should consider investing in a live wire detector, available from most DIY shops. This will signal if the wire you are about to cut is carrying an alternating main current (AC). However, the detectors have problems picking up direct current (DC) which you sometimes find on industrial premises. If you are unsure - don't cut.
K. Falls:Never climb on anything which may give way on you, topple over, or which you do not have an easy standing position on. You should always have both hands free when working - never get into the situation of balancing, relying on one hand hold, or having to stretch to cut or drill - you may fall. Also beware of standing on the mobile parts of equipment - the arm or jib of an earth mover for example, when you are cutting pipes or cables - the whole thing may crash away below you.
L. Ignition sources:An average machine has electrical cable and fuel lines in proximity to one another. If you cut live electric cables, and you have cut or are about to cut the fuel lines, and later the electric cables touch the body of the equipment or each other to create a spark, you might suddenly find that you are engulfed in flames. Unless you are certain that the electric is off or isolated (to isolate the electricity just remove the source by chopping through the mains or battery cables first) then don't cut both electrical and fuel cables in close proximity to one another.Chemicals can also be flammable. Lead-acid batteries, if you remove the cell caps, briefly give off flammable vapour - if you are smoking when you do this the battery might blow up in your face. Likewise, the vapour from solvents, paints and fuel can all evaporate, move, and be ignited by sparks, bright lights or matches/cigarettes. You should always ensure that your work does not create a fire hazard (unless you are deliberately torching something) which will endanger you, those with you, or those who might discover your handy-work.
M. First aid kit:You should always take some form of first aid kit - at least a few plasters and a bottle of clean water. If you don't use it on site then you should wash your hands with the water straight after leaving the site. A first aid kit is important - you should have plasters and antiseptic wipes to clean wounds. Remember, it you bleed everywhere, apart from the obvious health impact, they're going to have material to get a genetic finger print of you.The most important thing to take with you in terms of health and safety is common sense - never do anything unless you've thought about the implications of that action first!
[Back to Contents]
[Go to next section]mailto:webmistress@sabotage.org goto:webmistress |